
Trade shows are exciting, but let’s be honest… they’re exhausting too. You come back with sore feet, a buzzing brain, and a list of leads sitting in a spreadsheet. The question is, what now? You could spend hours manually crafting follow-up emails, or you can learn how to personalize and send bulk emails using popUP Email Automation to get it done in minutes.
In this step-by-step guide, we’ll show you how to send bulk emails, and personalize them, without sacrificing your sanity using popUP. For an in-depth walkthrough, check out this video:
How to send bulk emails
PopUP is the ultimate time-saver for anyone juggling a long list of email follow-ups. It’s designed to help you:
- Automate personalized email outreach.
- Map variables like {name}, {company}, and {custom1} for a human touch.
- Save hours of manual work while still maintaining authentic connections.
Say goodbye to copying and pasting and hello to more free time for what really matters.
Step 1: Upload Your Excel File
Once you’ve returned from your trade show, start by opening popUP. Click “Select Excel/CSV File” and upload your spreadsheet of leads. Make sure your sheet includes key details like:
- Names
- Email addresses
- Company names
- Additional notes (e.g., interests or conversations)
The app will automatically detect the columns and prepare them for mapping.
Step 2: Map Your Variables
Here’s where the magic happens. Map your spreadsheet columns to email variables like:
- {name} for personalized greetings.
- {company} to reference their organization.
- {custom1} for tailored details like product interests.
This ensures that each email feels unique and personal, even though it’s automated.
Step 3: Write Your Semi-Custom Email
Craft a subject line that grabs attention without screaming spam. For example:
- “Great meeting you at the Consumer Electronics Show”
- “Following up from Semicon West”
Then, dive into the email body:
- Start with a personalized greeting: “Hi {name}, it was great meeting you at {event}.”
- Reference their interests or work: “I enjoyed learning about {custom1} and what you’re doing at {company}.”
- Add a clear call to action: “Let’s connect for a quick chat” or “I’d love to explore how we can collaborate.”
The beauty of popUP is that you write this email once, and the app personalizes it for every lead.
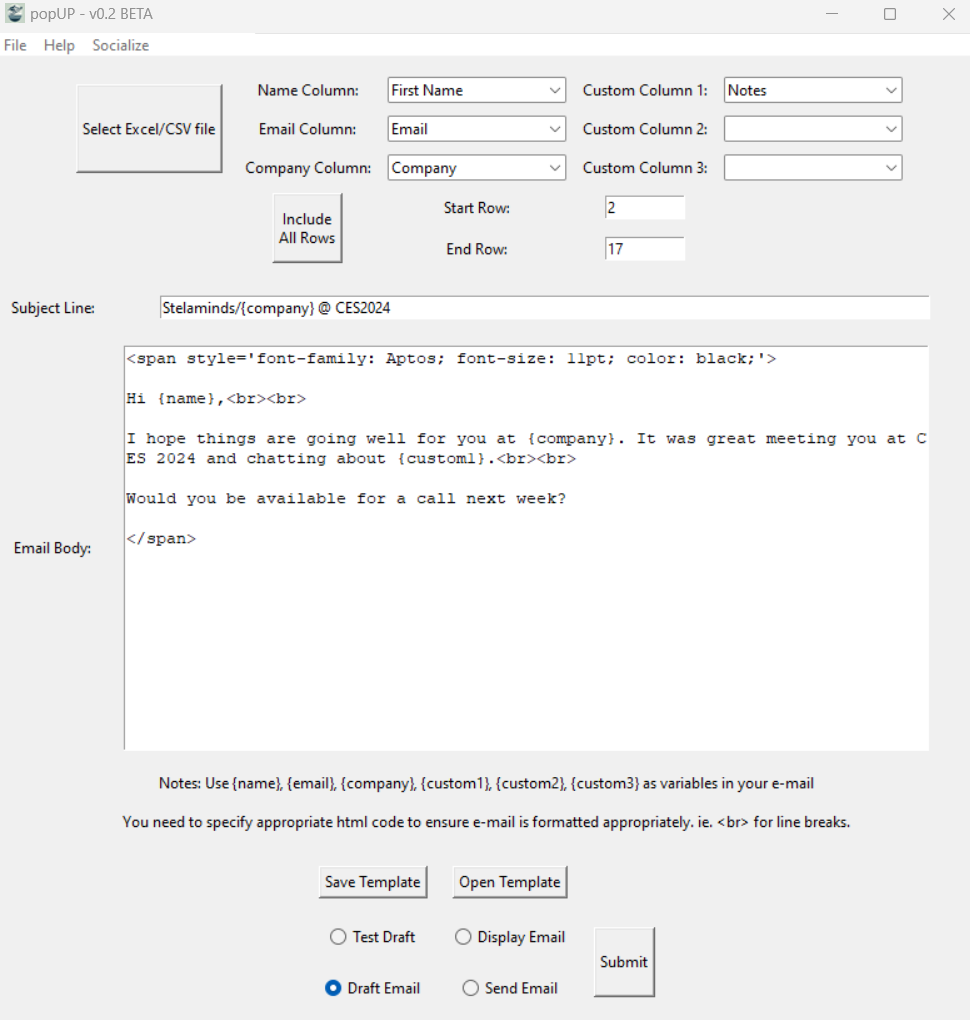
Step 4: Test Your Email
Before hitting send, click “Test Draft” to preview how the variables populate. This step ensures everything flows naturally with no awkward placeholders or formatting issues. If it looks good, you’re ready to move forward.
Step 5: Send or Draft Your Emails
Here’s where popUP truly shines. You can either:
- Send emails directly from the app.
- Draft them into your email client (e.g., Outlook Desktop, Microsoft 365, Gmail) for additional review.
No copying, pasting, or manual drudgery… just a streamlined, professional email workflow.
Step 6: Relax and Reclaim Your Time
Within minutes, your follow-ups are done, and your inbox is buzzing with replies. Take a walk, grab a coffee, or spend some time with your dog. You’ve earned it. That’s what popUP Email Automation is all about, getting you out of the inbox and back to what really matters.
Watch the Full Video Guide to Learn How to Send Bulk Emails
For a detailed walkthrough, watch How to Send Bulk Emails Using popUP Email Automation. The video covers every step and shows you exactly how to streamline your email workflow.