If you’re like me, you’ve probably spent more time than you’d like to admit staring at your inbox, wondering how on earth you’re going to send personalized emails to a list of 500 contacts without losing your mind. popUP Email Automation saved my sanity—and here’s how it can do the same for you.
Tradeshow Overload
So you’ve just attended a massive conference/tradeshow, and you ran around scanning every badge you could find… and hopefully you chatted with a few people as well. You’ve collected hundreds of email addresses, notes, and contacts that now you need to figure out how to follow up with. And you made all those “I’ll reach out with more information” promises, but now you don’t remember what information you were even talking about.
Now you’re back in your office, facing the task of following up with each of these contacts individually. You want to personalize each email to make it feel genuine—no one likes receiving a cookie-cutter message that screams, “I sent this to 500 people!” But you also don’t want to spend the next two weeks glued to your keyboard.

Take back your time with popUP Email Automation
How It Works: A Walkthrough
Step 1: Gather Your Contacts
First things first, you need to get all those email addresses into a neat Excel or CSV file. If you’ve been diligent or if you paid for a badge scanner, you already have something like this:

Step 2: open popUP
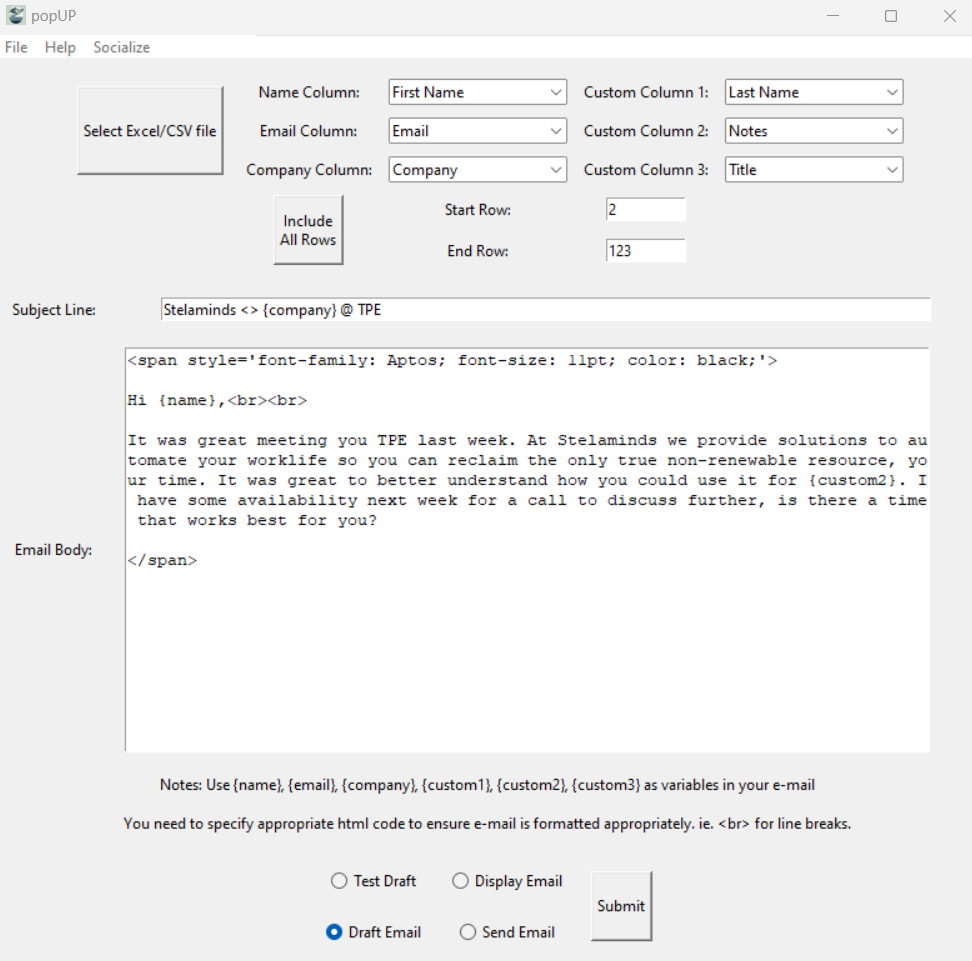
Now, open up popUP Email Automation. When the interface loads, it’ll ask you to upload your Excel or CSV file.
Step 3: Map Your Columns
popUP is pretty smart, but it still needs you to tell it what’s what. You’ll map the columns in your file to the fields popUP will use in your emails. For example:
- Name Column = First
Name - Email Column =
Email - Custom Field 1 =
Company - Custom Field 2 =
Notes
Step 4: Draft your Email
Now comes the fun part—writing the email. Here’s where you get to be creative. You can use variables like {name}, {company}, and {custom1} to make each email feel personalized without doing all the heavy lifting yourself.
Example:

Step 5: Choose Your Adventure
Before you hit send, popUP gives you options. You can draft the emails, popUP or display (Microsoft Outlook Desktop App only) them for a quick review, or just go full-send mode if you’re feeling brave. If you’re like me and want to avoid any “Oops, I meant to personalize that!” moments, I recommend drafting first and giving them a once-over.
Step 6: Hit Send and Relax
Once you’re happy with your emails, it’s time to send them out into the world. Sit back, sip your coffee, and let popUP do all the hard work. Within minutes, all your contacts will receive a personalized email that makes it seem like you spent hours crafting each one. Go ahead, take the credit—but don’t tell your boss so you can spend the rest of the day hitting the links.
Now go download popUP
popUP Email Automation is simple, efficient, and it frees up your time to do what you do best—whether that’s closing deals, brainstorming the next big thing, or just enjoying an extra hour of Netflix guilt-free. Try out popUP Email Automation free for 30 days.

